Category: Teaching Tips

Welcome to the Fall Semester! – September 2020 Faculty Newsletter

September 2020

We hope everyone is having a smooth transition into Fall semester! The Office of Faculty Development and Instructional Design (OFDIT) will be sending out a newsletter a few times each semester with updates on tools and resources from individual teams within OFDIT, and professional development events to assist with your online teaching needs.

We are pleased to present our first newsletter here!

Ensemble Video
Have you heard of Ensemble Video? If you’re using video in your SPS course, then Ensemble is something to consider. It’s features match, and in some cases, exceed those found in video hosting platforms like YouTube or Vimeo. Think of Ensemble like you own SPS YouTube channel but with significant advantages for educators, like no social media interruptions, no advertisements, no suggested videos. Furthermore, it’s integrated into Blackboard and tied to the SPS captioning service. More details on our Ensemble Video SPS Faculty page.

If you’d like to learn more, please consider registering for one our information sessions coming up. In the session, we will introduce the tool’s more salient features, including student viewing data, the Blackboard integration, and streamlined professional captioning. Auto-publishing, in-video quizzes, and student video submissions will also be discussed.

Annotate Tool in Blackboard
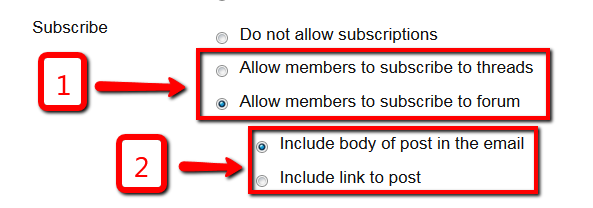
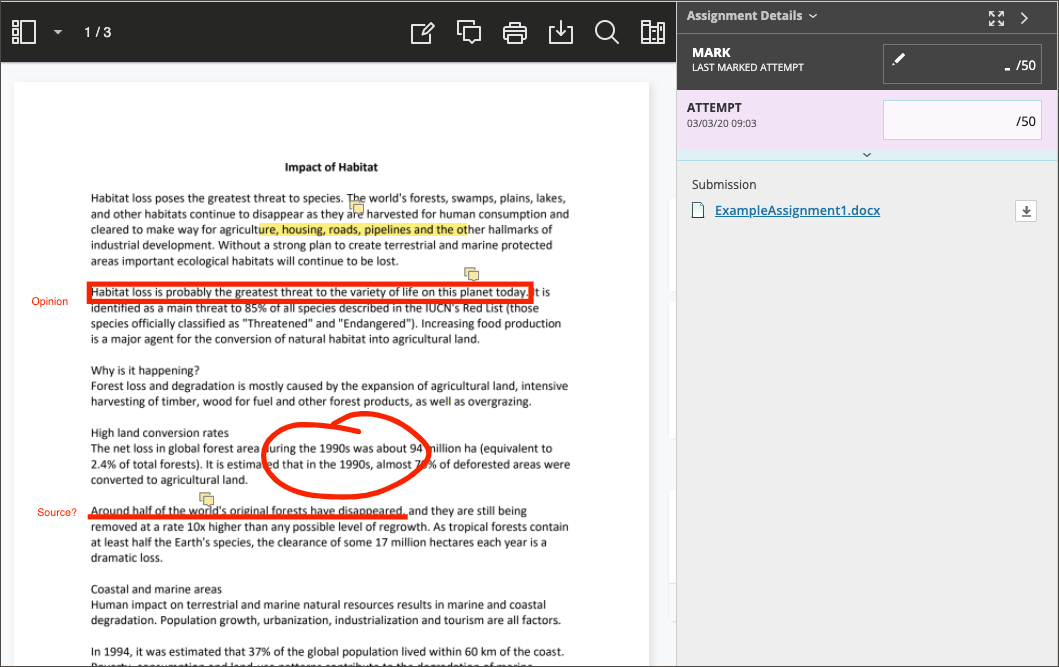
We would like to introduce everyone to Annotate, a new integrated grading tool in Blackboard, replacing Box View. Annotate allows instructors to provide customizable feedback to students’ assignments when they are submitted as any of the supported file types (not when entered as text directly). Annotate is integrated directly in the Grade Center; i.e. submitted files will open right in your browser so you can readily use available grading tools, such as free-hand drawing and erasing, or highlighting and underlining. Another option is to use images from your computer as well as ready-made or customized stamps (e.g. “approved” stamp or “draft” stamp). Annotate also features options for both in-line commenting and written comments, which appear in a side panel. Finally, Annotate allows you to download a student’s submission with your annotations, and to search for specific text within a submission.

To learn more about Annotate, please watch this video and review the Annotate support site by Blackboard (which includes a list of accepted file types when using Annotate). Reach out to our team at facultysupport@sps.cuny.edu for any questions you might have.

Important Note on Grading: CUNY Blackboard times out after 60 minutes. Be sure to save any grading comments before the 60-minute time limit or else you might lose your work.

Before you go, please remember our fall trainings and events! We are continuing our regular informal meetups on Oct. 21 and November 18. We also hope to see you at our upcoming faculty discussion on Trauma-Informed Pedagogy on October 2 from 12.45-2 EST. Please register using this link. Our fall trainings include sessions on Zoom Meeting for Student Hours, A Cut Above: Making Your Videos More Professional, VoiceThread: Humanize Your Online Course, Student Engagement in Online Learning, and more. Find more information and registration links on our SPS Faculty Community Site.

Thank you for reading! As always, please contact us at facultysupport@sps.cuny.edu with any questions or support requests. See you at one of our upcoming events, or for our next newsletter in October!

Your OFDIT Team


Teaching Tip: Using the Re-ordering Button in Blackboard

The re-ordering button in Blackboard is a neat way to re-arrange items on a page, such as discussion forums, weekly folders, etc., without having to scroll and then drag things all the way up and down with your mouse. This feature can be helpful when having to re-arranging items on a long content page, or if you’ve ever re-ordered items on your course site and had them mysteriously return to their previous order. The re-order button also helps users who cannot use the drag and drop feature in Blackboard because of mobility or other issues.

On your Blackboard course page, select the Keyboard Accessible Reordering icon in the upper right-hand corner.

In the Reorder box, select the item you’d like to move from the list. Use the Move Up and Move Down icons to adjust the order and click Submit.

Navigating Discussion Threads on Blackboard

After the latest Blackboard upgrade in December 2016, a new (old) feature has been re-introduced to your course sites: arrow buttons for navigating threads on the Discussion Board.

You’ll find these buttons in the top right corner of each thread page. If you use individual threads for each student in your weekly discussions, you might find these buttons particularly helpful for navigating from thread to thread, or to jump to the first / last thread with one easy click.

Happy navigating!

Replacing the Banner in Your Spring 2017 Course Site

As the Spring semester begins, you may be have heard from students that your course banner is not displaying. It’s true – unfortunately, due to a glitch in the Blackboard upgrade that occurred over winter break, most course banners are not displaying to students and need to be re-uploaded. It’s important that you re-upload your banner even if it displays normally to you, because it may still not be appearing to your students.

There are instructions on how to replace your banner below, but you can also watch this short video tutorial covering the same information.

The first thing you need to do is get the image file for your banner. If it is saved to your computer, you’re all set and can jump to the instructions below. If not, you can download your banner file either from your Spring 2017 site (if it is visible to you there), your Dev site, or a previous live (semester) site.

To download the banner file, go to the Announcements page. Right click on the banner image, select “Save Image As” and save the image file to your computer.

To re-upload the banner to your Spring 2017 site, scroll down to the “Control Panel” on the course menu. Click on “Customization,” and then on “Teaching Style.” Scroll down to the “Select Banner” section. Tick the box that appears next to “Delete this banner” and click on “Browse My Computer.” Select the file for your banner and click “open” in the pop-up window. Then click on “Submit” to save the banner file in your course site.

Please get in touch if you have any questions about this issue, or the steps described above.

Have a great start of the semester!
Antonia & Krystyna

Making New Semester Prep Easy With Date Management

One of the most important bits of bookkeeping we all have to do before the beginning of a new semester is to update all of the due dates, availability dates, and adaptive release dates in our Blackboard courses. Fortunately, Blackboard has a tool expressly for this purpose — Date Management.

date managementTo access the Date Management tool in your course site, scroll down to the Control Panel underneath your course menu, click on Course Tools, and then Date Management. Here, you will have the option to change all the due dates and availability dates in your course based on either the semester start date, or by a fixed number of days.

First, you might want to see a list all the dates in your course for review on one screen, which you can also do from this page. This is a great option particularly if you are inheriting an existing course because you can see which announcements, assignments, tests, or folders have dates associated with them and whether these are due dates, availability dates, or adaptive release dates.

To return to the options on the initial screen, click “Run Date Management Again” in the upper left-hand corner of the screen. Here,  you can now shift all the dates in your course based on the semester start date or by a fixed number of days. This might require a little arithmetic. For example, Fall 2016 began on a Thursday but Spring 2017 classes begin on a Monday. You can adjust all of the dates in your Spring 2017 live site at once using the course start date, but might have to adjust some dates back or ahead to have due dates for assignments follow the day/week system most instructors use at SPS (ex., Test 1 due Sunday of Week 1, Test 2 due Sunday of Week 2, and so on.)

Luckily the Date Management Tool has the flexibility to let you adjust each date individually, to select a group of items to adjust by the same amount, or to adjust all dates in the course at once.

To learn more about this tool, see Blackboard’s Help page on using Date Management and there are a number of videos on YouTube that explain it quite well, including this very short video from the Center for Innovation & Technology at Northern Kentucky University and this recording of a webinar on Date Management from the University of Miami.

We hope this tool will lighten some of the pre-semester work in your course sites. Please email us if you have any questions about Date Management, or any other Blackboard tool while preparing your course sites for the upcoming semester.

Looking forward to working with you,
Antonia & Krystyna

Teaching Tip: Facilitating Group Work in Online Courses

Group work promotes engagement with course material and prepares students for workplace collaboration; still, some students dread it. Careful planning can help you design online group activities that give your students the benefits of working collaboratively while avoiding the pitfalls of online group assignments.

group-work-imageIn online environments, it can take more time to coordinate group tasks and divide responsibilities among the group. It is a good idea to build in at least three weeks for groups to work on a small-scale assignment. Since online students do not have class meetings where they can exchange ideas and arrange their responsibilities, it is also important to ensure that each group has its own workspace, such as a group discussion board. Encourage members to connect early on, perhaps through an ice-breaker you design, before the assignment begins. The ideal group size online is three or four, since it is not uncommon in larger groups for some members to contribute less than others. For more information about best practices for online group work, check out Blackboard’s blog post or this article from Online Learning Insights.

Provide a platform for accountability and peer evaluation.
It’s important that group members be held accountable for the quality of their contributions, their levels of responsibility, and their professionalism in the group setting. Peer evaluations provide you with a way to factor those behind-closed-doors variables into each student’s grade. It’s a good idea to schedule peer evaluations several times over the course of a term in order to provide opportunities for adjustment and improvement. It’s also a good idea for you to check on groups to evaluate their progress and gauge whether all members are contributing. If you see that a group member is not participating, you can send them gentle reminders to get them back on track. You should also decide what kinds of consequences will be in place for group members who don’t participate, and communicate this clearly to students.

Build in opportunities for groups to interact with each other.
There are several ways to implement inter-group interaction. For example, the whole class could work on a single large project, with each group producing one part of the whole. At the end of the course, students can see and experience the final product they all contributed to. Alternatively, each group can work on its own version of a smaller project, and in turn provide feedback and critiques to other groups while seeing different approaches and perspectives. Wikis are a great tool for implementing both methods. As this article on effective online group work states, group activities often fall into one of three categories:

  • There’s no right answer, such as debates, or research on controversial issues.
  • There are multiple perspectives, such as analyzing current events, cultural comparisons, or case studies.
  • There are too many resources for one person to evaluate, so a jigsaw puzzle approach is needed with each student responsible for one part.

Also, see this blog post on four strategies for effective collaborative group work. Ultimately, the goal is to design group work that is truly collaborative, i.e. the students will benefit more from doing the activity as a group than doing it alone.

Want to learn more about facilitating group work in your Blackboard course site? Sign up for our training on October 21 at noon.

Krystyna, Sarah & Antonia


Turnitin available in Blackboard! And: Join us for a training.

With both Turnitin as well as SafeAssign available now, SPS faculty have more options for creating and checking writing assignments for originality within your Blackboard sites.

SafeAssign was recently integrated into the Blackboard Assignments interface. To use SafeAssign, simply tick the box in the “Submission Details” section of a regular Blackboard assignment.screenshot Safeassign in Blackboard

You may already know Turnitin from using it outside of Blackboard. It is now available CUNY-wide through Blackboard, as a separate assignment type in the Assessments dropdown menu.

screenshotA Turnitin assignment is fully integrated with Blackboard: students access it like any other assignment in your course, and you can view and grade assignments directly in your course site. Turnitin differs from SafeAssign primarily in that it has a much larger database, including billions of web pages and hundreds of millions of journals, periodicals, books, and student papers against which it compares students’ submissions for plagiarism.

Turnitin offers a user-friendly inline grading function, called Feedback Studio, where you can leave voice and text comments, markup papers with comments or “QuickMarks” (i.e. preset comments with explanations that you can customize to fit your needs and insert into students’ assignments), as well as Turnitin-specific rubrics or checklists for grading.

Also included are functions such as Revision Assignment, which allows you to create assignments with multiple drafts; and PeerMark Assignments, which give students an opportunity to participate in peer review, with Turnitin managing the distribution of papers for review according to settings you choose.

Here are the steps to replacing existing Blackboard assignments with Turnitin:

  1. Copy the assignment’s instructions and take note of its settings (e.g., in a Word document).
  2. Delete the existing assignment from your course site.
  3. Recreate it as a Turnitin Paper Assignment by hovering over Assessments > Turnitin Assignment. Paste the assignment instructions you had copied, and check all Optional Settings for accuracy.
  4. Remember to make these changes in both your dev and live site.

Note: Turnitin assignments are automatically created in a grading category called Turnitin Assignment. If you use a Weighted Total column to calculate the final grade, be sure to change it to include the Turnitin Assignment category, or change the category of your Turnitin Assignment in the Grade Center.

Some useful resources for learning more about Turnitin:

There is still time to sign up for our upcoming online Turnitin training sessions. Please join us on one of the following dates:
Tuesday, September 27 at 6pm
Thursday, October 6 at 3pm
Tuesday, October 18 at 12pm

Looking forward to working with you!

Antonia, Sarah, and Krystyna

Helpful Habits for a New Semester!

The beginning of the semester is always a good time to try something new to make teaching more effective and more efficient. We’d like to start the spring semester with both a pedagogical tip and a practical tip that hopefully will make your courses more successful and less time-consuming to manage.

Pedagogical Tip: Be consistent in both the structure and formatting of elements in your course site. For example, compare these two screenshots of my announcements page with each other:

consistency blog post

While it’s true that the second picture looks a little boring, compared with the variety in colors, titles, and fonts in the first picture, students will find it easier to develop the habit of attending to weekly announcements and to absorb the information they contain when the structure and the formatting are consistent.

Another reason to keep formatting consistent and low-key is to make text more accessible to screen readers, i.e. text-to-speech programs used by the visually impaired. Screen readers can get tripped up by inconsistent formatting or text with lots of different types of emphasis. So pick a font that you like and stick to it, and pick either bold, underline, or italics for emphasis, and stick to that. It will make things easier for both you and your students!

See our Accessibility Resources Site for more information on accessible course sites and materials.

Practical Tip: Keeping your Dev sites up to date. As you all know, the process of getting online courses up and running at the beginning of the semester can be a bit hectic (or even very hectic). A great way of making your own life easier is to keep your Dev site updated with all the changes you make to your course during the semester (the ones you want to keep, of course). You have a couple options for how to go about this:

  1. Always make changes to the Dev site immediately after making them in your live course
  2. change_log_doc1Keep a log of changes as you make them in the live course site in a document or spreadsheet. You can even keep this document in your course (just don’t make it available to users). Then, at the end of the semester when things are not so hectic, take an hour or two to sit down and add all the changes you want to keep in your Dev site.

Why is this so useful? Once you’ve updated your Dev site, your course is ready to copy. All you have to do at the beginning of the next semester is adjust all the due dates and availability dates for time-sensitive items in the course. This makes for a relaxing break!

Have a great spring semester,
Sarah & Antonia

Happy New Year! And: Getting updates through “Subscribe” for Blackboard discussions

All of us at OFDIT wish you a happy new year and hope you have had enjoyable holidays. May 2016 be a successful teaching year for all of you.

Starting last year, SPS is now also offering a 3-week winter session. When teaching an intensive course over such a short time, it can be especially challenging to keep up with new Discussion Board posts in your Blackboard course site. One solution for both you and your students is to use the Subscribe option offered for individual discussion forums. By enabling this feature — and subscribing to either entire forums or particular threads — you will receive an email every time someone in your course posts a new entry.

Aside from using this feature in an intensive course, where being responsive to students’ questions is even more time-sensitive than usual, it can also be helpful to enable subscriptions for forums such as “Q&A” or “Ask Your Instructor” in any of your spring or fall course sites.

Here is how to make subscription an option for yourself and your students:

1) On your course site, go to the discussion board.

DB dropdown menu2) Hover over the title of the discussion forum you’d like to enable Subscribe, click the downward arrow and select “Edit” from the menu.

3) On the next page, scroll down to “Subscribe” options.

DB allow subscriptions4) Here you can allow subscriptions to either the entire forum (recommended for Q&A forums, for example), or to specific threads within the forum. You can also choose to either include the body of the post in the email, or simply a link to that post.

DB subscribe5) Back on the Forum page you will now see the option to Subscribe on the banner above the list of threads. Make sure to click it to receive email notifications, and to let your students know about this option as well.

6) If you ever want to stop receiving these emails, simply click Unsubscribe.

Please note, after receiving an email reminder you will still need to log into Blackboard to leave a post or reply.

We have also created a new quick guide with more detailed step-by-step instructions for your reference.

Please feel free to contact us with any questions about this, or any other Blackboard features: Sarah Kresh and Antonia Levy


Troubleshooting Final Grades Calculation Brings Vacation Closer

happynewyearThe end of December signals the approach of the New Year. OFDIT hopes to help instructors manage their workload and bring those celebrations even closer with the publication of new Quick Guides explaining how to easily tabulate students’ final grades using either Total Column or the Weighted Total Columns.

Both guides outline which settings to check to guarantee that your students’ grades are accurate and easy to report.  Generally speaking, final grades correspond to the percentage of points students have earned relative to the number of point possible. In Blackboard, there are two ways you can calculate final grades: either by using Total Points and by setting up a  Weighted Total.

A Total Column calculates final grades by simply adding up all of the points a student has earned and dividing it by the total number of points possible in your course. In other words, the weighting of assignments is done by assigning a different number of points possible per assignment. For example, a paper worth 100 points counts more toward a student’s final grade than a quiz worth 10 points.

In contrast, a final grade calculated using the Weighted Total is based on the respective percentages you assign to various columns and categories of assignments. When setting up the Weighted Total column, you’ll determine the weight of either a column (i.e. a single assignment, such as the Final Paper), or a category (i.e. a group of assignments, such as discussions or quizzes). A Weighted Total is calculated independently of the actual points an assignment is worth. For example, in a scheme where essays are weighted to comprise 25% of the final grade and quizzes 10%, a paper worth 10 points and a quiz worth 10 points would have different values (weights) for the final grade. The Weighted Total quick guide walks instructors through the process of making sure their calculation is properly arranged to compute accurate grades.

Whichever method you use to calculate your grades, OFDIT can help. We are offering targeted training on this precise issue via our Brown Bag Bytes lunchtime workshop series. To register for these or other trainings please sign up here, or fill out our form for one-on-one training.

Happy New Year and Happy Grading!

Dominique & Antonia