Category: Blackboard Issues

Navigating Discussion Threads on Blackboard

After the latest Blackboard upgrade in December 2016, a new (old) feature has been re-introduced to your course sites: arrow buttons for navigating threads on the Discussion Board.

You’ll find these buttons in the top right corner of each thread page. If you use individual threads for each student in your weekly discussions, you might find these buttons particularly helpful for navigating from thread to thread, or to jump to the first / last thread with one easy click.

Happy navigating!

Replacing the Banner in Your Spring 2017 Course Site

As the Spring semester begins, you may be have heard from students that your course banner is not displaying. It’s true – unfortunately, due to a glitch in the Blackboard upgrade that occurred over winter break, most course banners are not displaying to students and need to be re-uploaded. It’s important that you re-upload your banner even if it displays normally to you, because it may still not be appearing to your students.

There are instructions on how to replace your banner below, but you can also watch this short video tutorial covering the same information.

The first thing you need to do is get the image file for your banner. If it is saved to your computer, you’re all set and can jump to the instructions below. If not, you can download your banner file either from your Spring 2017 site (if it is visible to you there), your Dev site, or a previous live (semester) site.

To download the banner file, go to the Announcements page. Right click on the banner image, select “Save Image As” and save the image file to your computer.

To re-upload the banner to your Spring 2017 site, scroll down to the “Control Panel” on the course menu. Click on “Customization,” and then on “Teaching Style.” Scroll down to the “Select Banner” section. Tick the box that appears next to “Delete this banner” and click on “Browse My Computer.” Select the file for your banner and click “open” in the pop-up window. Then click on “Submit” to save the banner file in your course site.

Please get in touch if you have any questions about this issue, or the steps described above.

Have a great start of the semester!
Antonia & Krystyna

Making New Semester Prep Easy With Date Management

One of the most important bits of bookkeeping we all have to do before the beginning of a new semester is to update all of the due dates, availability dates, and adaptive release dates in our Blackboard courses. Fortunately, Blackboard has a tool expressly for this purpose — Date Management.

date managementTo access the Date Management tool in your course site, scroll down to the Control Panel underneath your course menu, click on Course Tools, and then Date Management. Here, you will have the option to change all the due dates and availability dates in your course based on either the semester start date, or by a fixed number of days.

First, you might want to see a list all the dates in your course for review on one screen, which you can also do from this page. This is a great option particularly if you are inheriting an existing course because you can see which announcements, assignments, tests, or folders have dates associated with them and whether these are due dates, availability dates, or adaptive release dates.

To return to the options on the initial screen, click “Run Date Management Again” in the upper left-hand corner of the screen. Here,  you can now shift all the dates in your course based on the semester start date or by a fixed number of days. This might require a little arithmetic. For example, Fall 2016 began on a Thursday but Spring 2017 classes begin on a Monday. You can adjust all of the dates in your Spring 2017 live site at once using the course start date, but might have to adjust some dates back or ahead to have due dates for assignments follow the day/week system most instructors use at SPS (ex., Test 1 due Sunday of Week 1, Test 2 due Sunday of Week 2, and so on.)

Luckily the Date Management Tool has the flexibility to let you adjust each date individually, to select a group of items to adjust by the same amount, or to adjust all dates in the course at once.

To learn more about this tool, see Blackboard’s Help page on using Date Management and there are a number of videos on YouTube that explain it quite well, including this very short video from the Center for Innovation & Technology at Northern Kentucky University and this recording of a webinar on Date Management from the University of Miami.

We hope this tool will lighten some of the pre-semester work in your course sites. Please email us if you have any questions about Date Management, or any other Blackboard tool while preparing your course sites for the upcoming semester.

Looking forward to working with you,
Antonia & Krystyna

Retiring Learning Object Tools in CUNY Blackboard

Icons of Campus Pack tools in BlackboardAs you may have heard, CUNY will retire Learning Objects tools — i.e. Campus Pack blogs, wikis, journals, and podcasts — in Blackboard at the end of the Fall 2016 semester. If you have been using these tools, which have characteristic orange icons, you’ll want to save copies of student-created content for your records and recreate course activities using Blackboard-native tools.

We have created a short video tutorial that shows how to do this plus how to create Blackboard blogs and wikis in your course site to replace the ones that will be retired.

Here are the basic steps for saving your Campus Pack (CP) content:

  1. Go to your Blackboard course site.
  2. Navigate to the Campus Pack blog, wiki, or journal assignment.
  3. Click View.
  4. Click “Export”, or “Export Site” (in CP blogs and wikis, on the bottom-right of the menu; in CP journals at the top of the screen with the other menu options).
  5. Save the .zip file to your computer.

This process creates a compressed folder with an .html file for each page of the site (whether journal, blog, or wiki), which can be opened in any web browser. Please note, comments in blogs or wikis will not be retained. When saving journals, you can select an option to include comments.

To save blogs or wikis with comments, unfortunately the only way is to print each page with comments to a .pdf file:

  1. On the blog/wiki page, click on Print with Comments near the top of the menu to the right of the screen.
  2. For printer, select “.pdf” and then save the resulting PDF file to your computer.
  3. Repeat these steps for every page with comments that you wish to have a record of.

To save media from a CP podcast, open the podcast, right-click on the media in the player and select “Save Video/Audio As.”

Please email us with any questions you might have, or if you’d like any support with this transition.

Turnitin available in Blackboard! And: Join us for a training.

With both Turnitin as well as SafeAssign available now, SPS faculty have more options for creating and checking writing assignments for originality within your Blackboard sites.

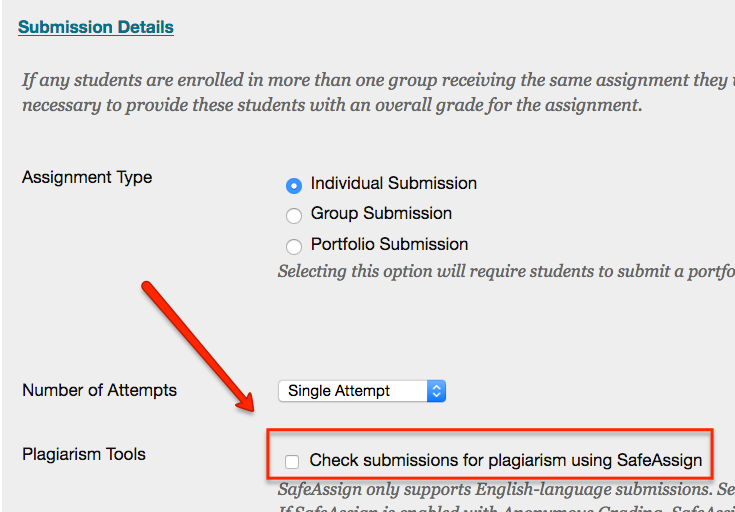
SafeAssign was recently integrated into the Blackboard Assignments interface. To use SafeAssign, simply tick the box in the “Submission Details” section of a regular Blackboard assignment.screenshot Safeassign in Blackboard

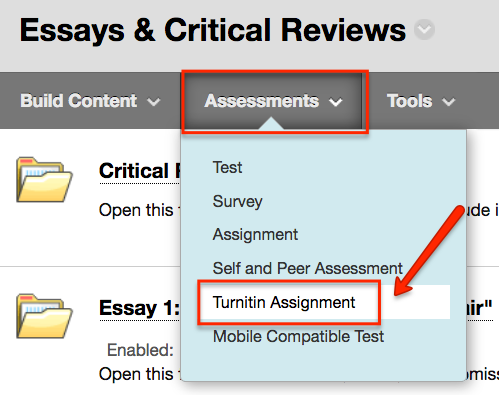
You may already know Turnitin from using it outside of Blackboard. It is now available CUNY-wide through Blackboard, as a separate assignment type in the Assessments dropdown menu.

screenshotA Turnitin assignment is fully integrated with Blackboard: students access it like any other assignment in your course, and you can view and grade assignments directly in your course site. Turnitin differs from SafeAssign primarily in that it has a much larger database, including billions of web pages and hundreds of millions of journals, periodicals, books, and student papers against which it compares students’ submissions for plagiarism.

Turnitin offers a user-friendly inline grading function, called Feedback Studio, where you can leave voice and text comments, markup papers with comments or “QuickMarks” (i.e. preset comments with explanations that you can customize to fit your needs and insert into students’ assignments), as well as Turnitin-specific rubrics or checklists for grading.

Also included are functions such as Revision Assignment, which allows you to create assignments with multiple drafts; and PeerMark Assignments, which give students an opportunity to participate in peer review, with Turnitin managing the distribution of papers for review according to settings you choose.

Here are the steps to replacing existing Blackboard assignments with Turnitin:

  1. Copy the assignment’s instructions and take note of its settings (e.g., in a Word document).
  2. Delete the existing assignment from your course site.
  3. Recreate it as a Turnitin Paper Assignment by hovering over Assessments > Turnitin Assignment. Paste the assignment instructions you had copied, and check all Optional Settings for accuracy.
  4. Remember to make these changes in both your dev and live site.

Note: Turnitin assignments are automatically created in a grading category called Turnitin Assignment. If you use a Weighted Total column to calculate the final grade, be sure to change it to include the Turnitin Assignment category, or change the category of your Turnitin Assignment in the Grade Center.

Some useful resources for learning more about Turnitin:

There is still time to sign up for our upcoming online Turnitin training sessions. Please join us on one of the following dates:
Tuesday, September 27 at 6pm
Thursday, October 6 at 3pm
Tuesday, October 18 at 12pm

Looking forward to working with you!

Antonia, Sarah, and Krystyna
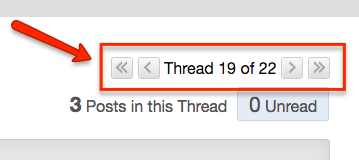
February Updates: Faculty Training, VoiceThread Workshops, and a Blackboard Issue

Welcome back! We hope your spring semester is off to a great start. OFDIT is welcoming the term with new trainings, workshops offered by VoiceThread, and an announcement about Blackboard’s discussion board.

February Faculty Training. We’ve added new topics to our successful half our lunch-time training series: BrownBagBytes. This month’s sessions spotlight features that help make courses more accessible and discussions more dynamic. Our captioning training shows you how to use YouTube to add accurate captions to your videos in a few simple steps. Captions aid language learners and students with hearing impairments or organizational issues. Our training on Blackboard’s student view explains how to use the tool to streamline and simplify your course site.  In addition to our lunch series, we are also offering a full hour-long training: Introduction to VoiceThread. These show how the VoiceThread tool integrates audio and video commentary in your course discussions.

Sign up here to register for our February trainings, or use this form to schedule a one-on-one session that works around your schedule.

VoiceThread-IconWorkshops by VoiceThread. If you can’t join OFDIT, there are still opportunities to learn from workshops offered by VoiceThread this month, including sessions on incorporating VoiceThread discussions into your Language and STEM curriculum.

DB list view tree viewIssue with “Tree View” on Blackboard discussion board. You might have noticed that since January, your view of the Discussion Board keeps reverting back to List View automatically after setting it to Tree View. Blackboard is working to find a solution to this issue, but in the meantime, we’d like to pass on a helpful note one of your colleagues had drafted (thank you!) to explain the situation to his students. Please feel free to use this to make your students aware of the issue as well.

This course relies on the Blackboard Discussion Board for our class discussions. However, there is currently an issue with how we are able to view the discussion forum. Each time you enter the forum the posts appear in what is called “List View.” We need to see them in “Tree View,” however, in order to follow the threaded discussions and for you to see who has commented on your posts and for you to participate in ongoing exchanges with your classmates.  What to do? — For now each and every time you enter any forum you need to look at the upper right and click on the “Tree View” button. I do hope this will be resolved soon and that the tree view will be the default and remain the setting for all forums. Until then, thank you for your patience and understanding.

If you have questions about these or any other instructional technology please do not hesitate to reach out to us. We look forward to working with you this spring!

Antonia, Sarah, and Dominique